Set Up Your Phone with Mobile-X
**Scope**
This article outlines how to configure your unlocked iOS or Android device with Mobile-X.
Requirements
- Mobile-X provisioned SIM or QR Code for eSIM (You should have received this from your provider)
- Unlocked iPhone XR or newer, using iOS 15.4 or higher OR Samsung Galaxy S21
- A paperclip
Quick Links
Physical SIM
- 1Use a paperclip or thin object to open the SIM tray on your phone
- 2Insert the SIM into your tray and place the tray back into your phone
- 3Your device should begin working immediately. Check to make sure you can make & receive calls, send SMS and MMS, and access the internet.
- 4If your device does not begin working immediately, you must configure the APNS settings in the section below.
- 5If your provider offers hotspot capabilities, follow these steps to set up your hotspot
- 6
- 7
eSIM for iOS
- 1
From your iOS device, go to Settings > Cellular Data
- 2
Select Add eSIM
- 3
Select Use QR Code and scan the provided code
 4. Press Continue
5. You will be prompted to enter a name for the SIM, choose a descriptive name or one of the preselected labels
6. Choose which SIM to use for mobile data
7. If your device does not begin working immediately, you must configure the APNS settings listed below.
8. If your provider offers hotspot capabilities, follow these steps to set up your hotspot
4. Press Continue
5. You will be prompted to enter a name for the SIM, choose a descriptive name or one of the preselected labels
6. Choose which SIM to use for mobile data
7. If your device does not begin working immediately, you must configure the APNS settings listed below.
8. If your provider offers hotspot capabilities, follow these steps to set up your hotspot
eSIM for Android
- 1From your Android device, go to Settings > Connections
 2. Select SIM card manager
 3. Select Add mobile plan
 4. Select Scan carrier QR code and scan the code provided
 5. Select Confirm
 6. Select whether to allow your secondary SIM to use data during phone calls
 7. Under Preferred SIM Card, choose which SIM to use for data and MMS
NOTE: The Samsung Galaxy S21 has a known issue where only the preferred SIM in a dual SIM setup may be used to send and receive MMS messages.
 8. If your device does not begin working immediately, you must configure the APNS Settings listed below.
9. If your provider offers hotspot capabilities, follow these steps to set up your hotspot
8. If your device does not begin working immediately, you must configure the APNS Settings listed below.
9. If your provider offers hotspot capabilities, follow these steps to set up your hotspot
Configure APNS Settings (iOS)
- 1From your iOS device, go to Settings > Cellular Data
- 2Navigate to Cellular Data Options and set Data Roaming to Enabled
 3. Select Voice & Data and confirm 4G or LTE is selected and VoLTE is Enabled
 4. Navigate to Cellular Data > Network Selection and make sure Automatic is Enabled
 5. Navigate to Mobile Data Network
6. Scroll down to MMS and set the APN to globaldata
5. Navigate to Mobile Data Network
6. Scroll down to MMS and set the APN to globaldata
NOTE: Make sure not to exit the field
 7. Scroll back up and set Use Carrier Settings to Enabled
 8. Reboot your device
Configure APNS Settings (Android)
- 1From your Android device, go to Settings > Connections
2. Select mobile networks
 3. Select Access Point Names
4. Select the APNS settings for the business SIM
5. Select Add New
6. Enter the fields below
3. Select Access Point Names
4. Select the APNS settings for the business SIM
5. Select Add New
6. Enter the fields below
- 1Name: globaldata
- 2APN: globaldata
- 3
- 4Multimedia message proxy: 37.18.129.90
- 5Multimedia message port: 8008
- 6APN Type: default, mms
- 7APN Protocol : IPv4/IPv6
- 8APN roaming protocol : IPv4/IPv6
- 9Click Save
- 10Ensure the newly created globaldata APNS is selected
- 11Reboot your device
- Note: If you need to switch the mobile number used for iMessage® and FaceTime® on your Dual SIM with an eSIM capable Apple® iPhone®, follow these step-by-step instructions.
Note:The steps below apply to the following Apple iPhone models: - iPhone XS / XS Max and newer models
- iPhone SE (3rd Gen)
- With Dual SIM setup on your device, you can use iMessage and FaceTime with two mobile numbers. Select the mobile number(s) by doing the following:
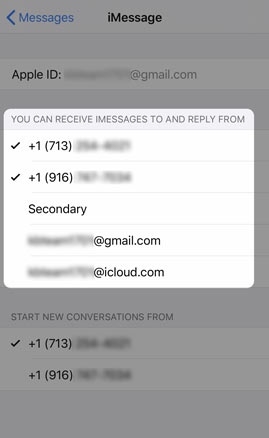
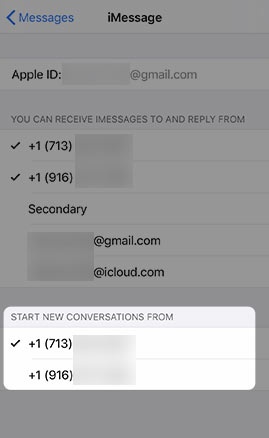
**Select Number(s) Used for iMessage**
- 1
From a Home screen, navigate: Settings>Messages.
- 2
If an app isn't available on your Home screen, swipe left to access the App Library.
- 3
Tap Send and Receive.
- 4
Select the mobile number(s) you'd like to use with iMessage. 1. Selected when a checkmark is present.
 - 5
If 2 mobile numbers are selected , select the desired number used to start new conversations.
- 6
Selected when a checkmark is present.
Note: For additional Dual SIM info, check out this Apple article.
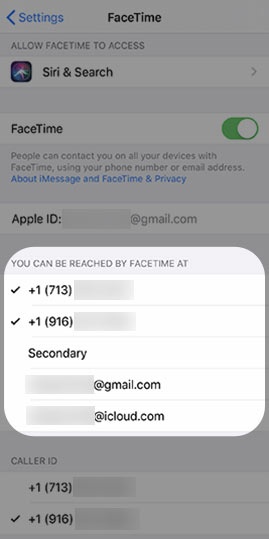
**Select Number(s) Used for FaceTime**
- 1
From a Home screen, navigate: Settings > FaceTime.
- 2
If an app isn't available on your Home screen, swipe left to access the App Library.
- 3
From the 'YOU CAN BE REACHED BY FACETIME AT' section, select the desired number(s) used for FaceTime
- 4
Selected when a checkmark is present.
Note: For additional Dual SIM info, check out this Apple article.
Related Articles
Was this article helpful?